How to run the TFS upgrade wizard
First you install TFS, then you run the upgrade configuration wizard. If you moved TFS to new hardware, you have to change the URL for TFS.
![]() Tip: After you install TFS, the configuration tool appears automatically. If for some reason you don’t see it, you can access it from the TFS administration console. Launch TFS administration console from the Start menu. In the admin console, choose Application Tier, and then choose Configure Installed Features.
Tip: After you install TFS, the configuration tool appears automatically. If for some reason you don’t see it, you can access it from the TFS administration console. Launch TFS administration console from the Start menu. In the admin console, choose Application Tier, and then choose Configure Installed Features.
Required Permissions
To perform this procedure, you must be a member of the Administrators security group on Windows server. If you’re using the basic upgrade path, these are the only permissions you need.
If you plan to configure reporting, you must also be a member of the Administrators security group on the server that is running SQL Server Reporting Services. If you plan to configure SharePoint Products, you must be a member of the Farm Administrators group on the SharePoint Products administration site. If you did not install the Database Engine that will host the configuration database or a database administrator manages the instance of SQL Server that you are using, you must be a member of sysadmin Server role in SQL Server.
To run the TFS installer on the new hardware
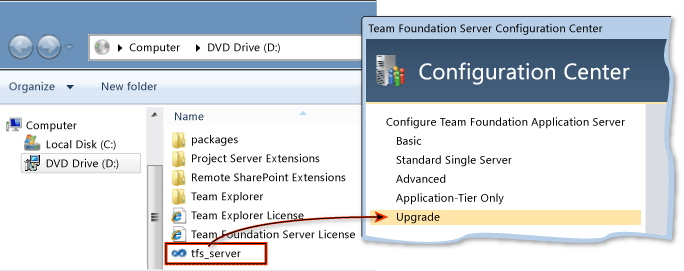
- Insert the Team Foundation Server DVD in the drive and launch the tfs_server.exe file.

- On the license terms dialog box, accept the license terms and then choose Install Now.
If you want to install Team Foundation Server to a specific location in the file system, choose the browse button (…) next to the default install location.
To run the TFS configuration wizard
- In the Team Foundation Server Configuration tool, choose Upgrade, and then choose Start Wizard.

The Team Foundation Server Upgrade wizard appears. - Read the Welcome screen and click Next.
- Type the name of the SQL Server instance that hosts the data from an earlier version of Team Foundation Server, and choose List Available Databases.
The wizard lists deployments of Team Foundation Server that you can upgrade. If multiple deployments are listed, choose the one that you want to upgrade. - Select the By checking this box, I confirm that I have a current backup check box, and then choose Next.
If you need to do a backup, you can choose Click here to launch the Database Backup Tool, follow the steps below, then continue with the TFS upgrade wizard.
The TFS Database Backup Tool displays the databases it finds on the SQL Server instance specified in SQL Server Instance.- In Select databases to backup, choose the databases to back up.
Need help? List of TFS 2010 databases on MSDN; List of TFS 2008 databases on MSDN. - In Backup Databases to, accept the default location or enter another.
Note: If you want to overwrite backups stored in this network location, you can choose Overwrite existing database backups at this location. - Choose Backup Now.
The Backup tool reports progress on each database being backed up. - Choose Close.
- In Select databases to backup, choose the databases to back up.
- Choose Use a system account to use Network Service as the service account for TFS.

- If you use a user account, you must type its password.
- To test the user account and password combination, you can choose Test.
- Under Authentication Method, choose NTLM or Negotiate (Kerberos), and then choose Next.
- If you choose NTLM, NTLM authentication is used. This option is the default setting.
- If you choose Negotiate (Kerberos), Kerberos authentication is attempted first. If that authentication fails, NTLM authentication is used.
- If you’re upgrading from TFS 2008, you can specify a Port or Virtual Directory or you can accept the default values. If you’re upgrading from any other version of TFS, you must skip to the next step. On client operating systems, you must skip to step 10. You cannot configure SharePoint Products or the reporting feature of Team Foundation Server on a client operating system.
- Select the Configure Reporting for use with Team Foundation Server check box to use reporting and then choose Next.

- Enter the name of the server that is running SQL Server Reporting Services in Reporting Services Instance and choose Populate URLs.
The URLs for the report server and its management site appear in the drop-down lists for Report Server URL and Report Manager URL.

- Make sure the URLs that you want to use for Team Foundation Server appear in the drop-down lists and then choose Next.
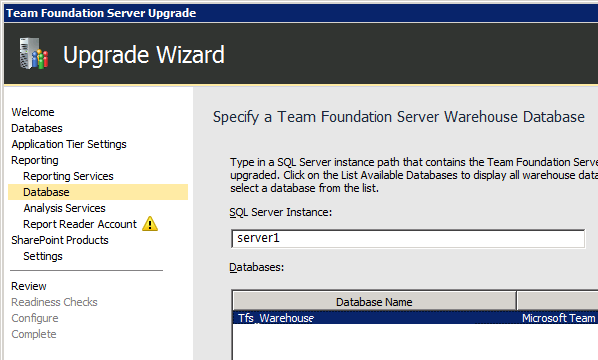
- If you’re upgrading from TFS 2008, skip to the next step. Otherwise, type the name of the server that is running the Database Engine and Full-Text Search to host the warehouse database, and then choose List Available Databases.
The wizard lists available warehouse databases that you can upgrade. Choose the database that you want to upgrade, and then choose Next.
You can choose Test to test the connection to SQL Server.

- Enter the name of the server that is running SQL Server Analysis Services in SQL Analysis Services Instance and choose Next.
To test the connection to SQL Server, you choose Test. - Enter the name and the password of the report reader account and choose Next.

If you specified a user account for the service account of Team Foundation Server in step 5 and you want to use a different account in this step, you must select the Use a different account than the Team Foundation Server service account for the Reporting Services report reader account check box.
Choose Test to test the user account and password combination.
- Enter the name of the server that is running SQL Server Reporting Services in Reporting Services Instance and choose Populate URLs.
- Select the Configure SharePoint for use with Team Foundation Server check box to configure SharePoint Products and choose Next.

On the SharePoint Products Settings page, perform one of the following steps:- Choose Use current SharePoint settings to retain your settings for SharePoint Products, and then choose Next.

You typically use this option to continue to use the existing portal, which must have the new TFS extensions for SharePoint installed and configured. If your old portal is on the server you are upgrading, the new extensions are configured automatically. - Choose Use an existing server farm for SharePoint, enter the URL for the SharePoint web application and the SharePoint Administration site, and then choose Next. To test the connection to each of these URLs, you can choose Test.
You typically use this option to migrate to a new portal, which must contain your migrated data for SharePoint Products.
- Choose Use current SharePoint settings to retain your settings for SharePoint Products, and then choose Next.
- If you’re upgrading from TFS 2008, accept the default values for project collection name and description or optionally enter a new name and description and then choose Next. If you’re upgrading from any other version of the product, skip to the next step.
- On the Review page, review your settings, and choose Next.
The wizard validates your configuration. - Choose Configure.
The wizard applies configuration settings. - Choose Next.
Your data is upgraded; Progress reports appear and show the status of each component.

- Choose Next.
- Read the final summary screen, and then choose Close twice; once in the wizard and then again in the configuration tool.
 Note: If the upgrade fails, see the detailed log files by choosing Click here to open a complete log on the summary screen. After you resolve any outstanding issues that are identified in the log file, you can resume the upgrade by using the Team Foundation Administration Console. On the Status tab in Team Project Collections, choose Create Collection, and then choose Rerun job.
Update the URL for TFS
If you used the advanced upgrade path, you moved TFS to new hardware and now you must update the server URL on the TFS application tier and in the TFS extensions for SharePoint. If you used the standard or basic upgrade paths, you can ignore both of these procedures.
Update the URL for TFS on the TFS application tier
- On the TFS application tier, open the administration console for Team Foundation Server.
- In the navigation bar, choose Application Tier, and then click Change URLs.
The Change URLs window opens. - In Notification URL, type the URL for the new application-tier server, and then choose OK.
Update the URL for TFS application tier in the TFS Extensions for SharePoint
- On the server running SharePoint, open the administration console for Team Foundation Server.
- In the navigation bar, choose Extensions for SharePoint Products, select the SharePoint Web Application and then click Modify access.
The Change URLs window opens. - In URL for Team Foundation Server, type the URL for the new application-tier server, and then choose OK..
Next Step: Set up a new build machine
After you upgrade the application tier, you may want to install the new build service. You can’t use TFS 2010 build service with Team Foundation Server 2012, but you can install the new build service side-by-side on the same server as the TFS 2010 build service.

